Solution, bring up the VM in virtual box and then use vmware converter to bring it into ESXi
Update the VM using YUM and using the newest newest vmware converter.
So, running uname -r now gives me 2.6.32-504.16.2.el6.x86_64
VMware converter standalone is now 5.5.3
Choosing ‘To Basic’ and unchecking create optimized partition layout
In order to try this the GUI is hard to follow, you have to
- On the Options page of the Conversion wizard, click Data to copy in the options list.
- Click Advanced and select the Destination layout tab.
- Select the volume that contains the
rootdirectory and click To basic.
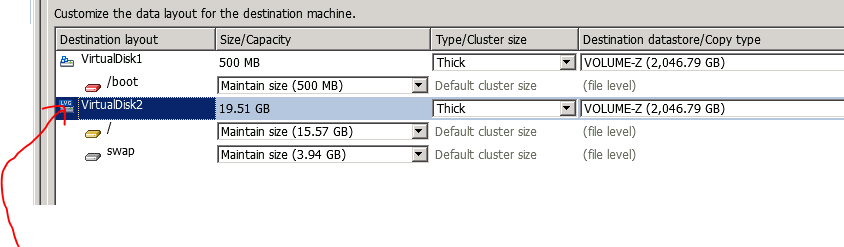
Click there and then the ‘To Basic’ option becomes available
Then I was finally able to boot!
I did replace the E1000 NIC since it tends to PSOD vmware
—- Notes of various attempts below —
This time around I’m going to try firing it up in Virtual box and then use the vmware converter.
First step, run vmware converter as an admin.
I choose to not bring up the network automagically, hopefully I can avoid a second PSOD
Gahck
FAILED: An error occurred during the conversion: ‘ * got kernel major revision as ERROR:
kernel version has to be in format 2.6.*, version 2.6.32-504.1.3.el6.x86_64 is not supported (return code 1)’
—
time to hit the google
Ok that was vmware converter 5.1.0, now going to try 5.5.0 newer is better right?
Ok 5.5.0 converted successfully! Let’s see if it boots
gah, lot’s of no such device messages
So, a hint from here http://www.linuxquestions.org/questions/linux-newbie-8/won’t-mount-dev-root-on-sysroot-during-boot-907463/
In order to try this the GUI is hard to follow, you have to
- On the Options page of the Conversion wizard, click Data to copy in the options list.
- Click Advanced and select the Destination layout tab.
- Select the volume that contains the
rootdirectory and click To basic.
Click there and then the ‘To Basic’ option becomes available
—-
Ok, now we get to have more fun!
Get yourself a rescue CD
mount –bind /proc /mnt/sysimage/proc
mount –bind /dev /mnt/sysimage/dev
mount –bind /sys /mnt/sysimage/sys
chroot /mnt/sysimage
For CentOS 6:
Create a backup copy of the current initramfs using the kernel version identified earlier:
cp -p /boot/initramfs-2.6.32-358.el6.x86_64.img /boot/initramfs-2.6.32-358.el6.x86_64.img.bak
Now create the initramfs for the current kernel using the specific kernel version we documented at the beginning:
dracut -f /boot/initramfs-2.6.32-358.el6.x86_64.img 2.6.32-358.el6.x86_64
—
Hmm still not much success, I’m going to try updating the VM using YUM and using the newest newest vmware converter.
So, running uname -r now gives me 2.6.32-504.16.2.el6.x86_64
VMware converter standalone is now 5.5.3
Choosing ‘To Basic’ and unchecking create optimized partition layout

[…] #OSSEC-VM 2.8.1 install on #ESX5.1i second attempt SOLVED […]